Photography Tips
As referred to above, check out BrickMonkey’s Article about HDR Photography for details and tips that you’ll need. In his article he mentions taking a capture of 3 images with different exposures. Sadly enough on regular cameras or on mobile phones you can’t really do this, so you’ll have to shoot image by image to get the result. An HDR Image combines from 3 to 7 images together, but for our first try let’s use only three. To begin, set your camera to a mode that allows exposure to be set manually by the user. Auto usually works quite well here, since we’re only adjusting the EV (Exposure Value).
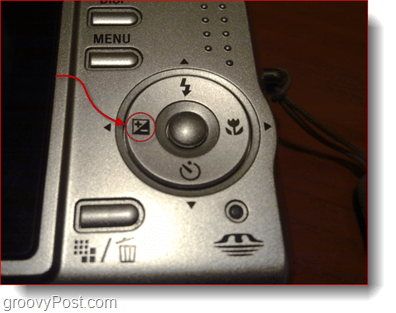
Now find the button that adjusts the Exposure Value and press it to show the different exposure settings. It’s icon is a box with a Plus and Minus symbols.
Keep your camera at the same position for each shot. You can use the help of a tripod or just place your camera on a steady surface and hold it down with your hand while you’re adjusting the exposures for each shot (some cameras have a feature that takes 3 or 5 pictures with different exposures for each picture, but we’re talking about mobile phones and cheap cameras here so we’ll have to manually adjust exposures for each photo). Use macro for close-ups and mess around with White Balance if your current shooting mode allows it. Keep the ISO low to prevent noise and avoid using image sharpening because some cameras can’t focus correctly with this setting on.
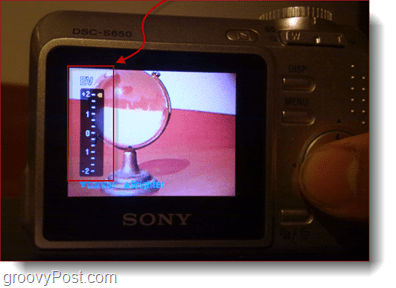
Take the three images at three different exposures. Use +2, 0 and –2 as the EV setting on the images. After taking the photos, when put side-by-side for comparison they should look something like this:
You’re done shooting! Lets get that USB cable and upload the images! All that’s left to do is blend things together with Photoshop. Note: Even if you’re a little off with the alignment on one or more of the images you shouldn’t worry – PSCS5 Has a groovy feature called Remove Ghosting which will help you with any problems when blending the images together.
Merging to HDR Pro
Once you’ve got the three photos uploaded to your PC launch Bridge and browse to the location to which the photos were uploaded to. Afterwards mark the three images you’ll be using and go to Tools > Photoshop > Merge to HDR Pro.
Wait for Photoshop to start-up. You will see that once it loads it will start to merge the images all by itself. Afterwards you’ll come across a Merge To HDR Pro window where you’ll be able to adjust different settings to get the image to look the way you want.
To the right will be the panel from where you can make your adjustments. Start out by selecting a preset. The Surrealistic and Monochromatic presets are perhaps the settings that will make the biggest impression. You are still free to choose any filter that you want. For this tutorial I’ll be using a Surrealistic High Contrast preset and the Remove Ghosting feature which I told you about earlier in the article.
After selecting a Preset you should adjust the sliders until the image matches your preferences. For this image I increased the Saturation, decreased the Detail, Increased the Shadows, Highlights and Gamma and decreased the Exposure. My final result looks great and all that I have to do now is press OK:
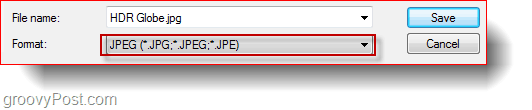
Upon pressing OK and waiting for a few seconds, you will be brought to your final image opened up in Photoshop. From Photoshop you can do some final adjustments and tweaks and when you’re happy with the result a quick Ctrl+S will save the image. Make sure you save your image as a JPEG or a PNG otherwise your friends will find it hard to open your cool picture when you send it to them!
You’re ready! This trick is very helpful for when you want to capture 100% of the detail in a certain object and even more helpful for when you want to impress your friends with your awesome photography (and Photoshop) skills. Comment Name * Email *
Δ Save my name and email and send me emails as new comments are made to this post.


![]()
